How To Backup Zimbra Email and Upload The Backup File Into Thunderbird For Offline Email Storage
September 4th 2019

Note: As of 2025, we no longer provide hosting or support for Zimbra. This article is provided for reference only.
Shortcuts:
1. Download Thunderbird
2. Backup Zimbra Emails
3. Download 7-Zip for Extraction
4. Extract .tgz Files
5. Import To Thunderbird
Has your Zimbra Email account ever filled up to the point that you find yourself frantically deleting important emails in order to stay within your storage limit? Why not save your important business emails offline where they don’t count towards your account limit? With the Zimbra Desktop Client ending support in October 2019, our team at SilverServers has found another great way to backup, store, and access Zimbra emails offline by using the Thunderbird desktop email client.
At SilverServers, we provide Zimbra’s Email Collaboration services as a fully featured alternative to Microsoft Exchange and other email collaboration suites. What we have noticed while providing this service is that over time, storage limits fill up with important messages that shouldn’t be thoughtlessly deleted, and there never seemed to be an easy way for clients to decrease the amount of emails in their account. They were always left with the options of either deleting emails or upgrading their accounts - neither of which is ideal in many situations.
Zimbra users who have their accounts configured with Microsoft Outlook can use the helpful AutoArchive feature, but for everyone else there isn’t an option that is as easy as AutoArchive. In this article, we’re going to lay out step by step instructions for how to backup your Zimbra emails then upload that backtup file into a free, offline, desktop email program called Thunderbird. This way you can still have access to all of your emails without having them fill up your Zimbra storage.
The first time you or your office tech follow these steps, it may take you 45 minutes to an hour to complete the process. Any subsequent times, it will take much less time because you will have all of the add-ons already installed and ready to be used.
We use Thunderbird in these instructions because it’s a free email program created by Mozilla (the creators of the Firefox browser) that we trust. It's a great desktop email program that provides a lot of functionality, but for the purpose of this article we’re going to focus on its ability to create offline folders on your computer to store your backed up Zimbra emails.
Here are the steps you will need to take in order to install Thunderbird and the needed add-ons, backup your emails in Zimbra, and upload your backup file into Thunderbird. If you’re a client here at SilverServers, feel free to give us a call if you get stuck! Otherwise, send us an email at support@silverservers.com
1. Download Thunderbird and the Needed Add-ons
First we need to install Thunderbird on your desktop. Remember that when emails are in offline folders, they are only accessible on the computer you download them to. Keep that in mind by selecting a computer to store your emails on! Here are the steps for downloading and installing Thunderbird and the Add-ons you will need:
1. On the computer you intend to store your emails on, go to https://www.thunderbird.net/en-US/
2. Click the "Free Download" button.
3. Once the file is downloaded, install Thunderbird to your Desktop
4. Open Thunderbird.
5. Click the "hamburger menu" on the top right (three horizontal lines or 3 dots) and select Add-ons. This will open the Add-ons manager tab in your email software.
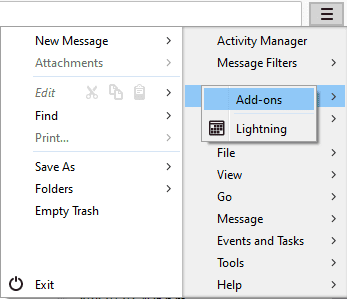
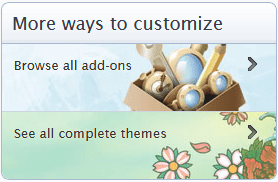
6. In the "More ways to customize" box, click the "Browse all add-ons" button. This will open the Add-ons tab.
7. In the search bar near the top-right, search for "ImportExportTools NG". Click on that option.

8. Click the green "Add to Thunderbird" button
9. Click the "Install Now" button
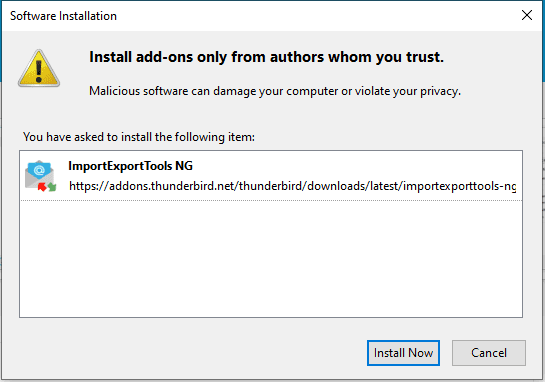
10. After installation, if you want to check if it was successful, go back to your Add-ons Manager tab and click the Extensions button on the left. You should see ImportExportTools NG in the list of Extensions.

2. Back Up Zimbra Emails
In this step we will show you how to download some or all of your Zimbra emails onto your computer in a compressed file.
1. Sign into the Zimbra web interface at zimbra.silverservers.com
2. Navigate to the Preferences tab
3. In the left sidebar menu, navigate to "Import/Export"
![]()
4. In the Export menu, to export emails, select “Account” in the “Type:” section and keep the source as “All Folders” (unless you only plan to backup a specific folder)
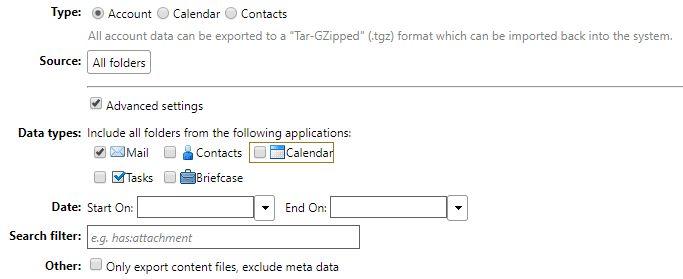
5. To backup only emails, check the "Advanced settings" box then deselect all of the "Data types:" boxes except for "Mail"
6. On the right, select Export. A file will be downloaded to the Downloads folder on your computer. The file type will be ".tgz".
3. Download 7-zip
In this step we will download a tool that can decompress the compressed file that we downloaded from Zimbra in the last step. Please note that any tool similar to 7-zip which can decompress a .tgz file will work. For example, WinZip works too, if you have that.
1. In a web browser, visit https://www.7-zip.org/
2. Download the 32-bit or 64-bit version of 7zip, depending on your computer’s architecture. If you don’t know which you need, do a Google search for something like “how to know if my computer is 32 or 64 bit”. You should be able to find instructions for determining which setup you need.
3. After the file downloads, click on it to install 7-zip.
4. Click "Install" on the 7-zip window that pops up. Wait for it to install.
4. Extract Emails Files From .tgz File Into Windows Explorer
This step will show you how to decompress the Zimbra backup file so that you can access the individual email files in the next step. Please note that these instructions are for 7-zip. For other programs, use their instructions to extract the .eml files
1. In Windows Explorer, navigate to your Downloads folder, or wherever you have moved/saved your .tgz file
2. Right-click on the .tgz file, hover over the 7-zip option, then select the option that say Extract to "[it will suggest a folder name here]"
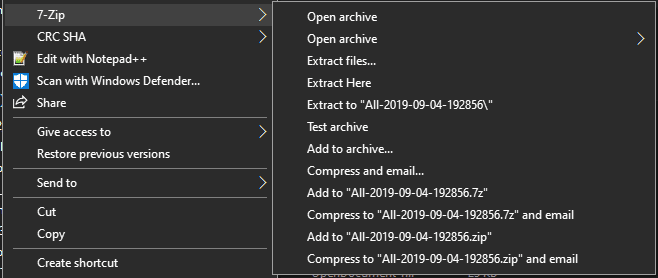
3. Open the new folder
4. Here you will find a .tar file. Right click on it, hover over 7-zip, and select Extract Here
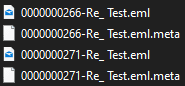
5. A new folder should appear. Inside it you will see .eml files. These are your emails.
5. Import Your Backed Up File Into Thunderbird
Here we’ll show you how to import your decompressed email files into Thunderbird so that you can read and review them and their attachments. This is the last step!
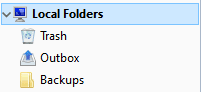
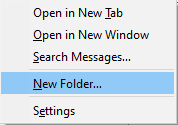
1. In the left sidebar menu, right-click on "Local Folders"
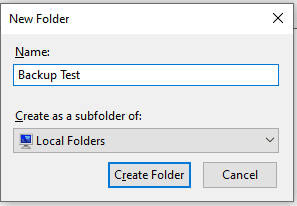
2. Select "New Folder..."
3. A box will pop up allowing you to give your folder a name. Perhaps name the file with the date.
4. Right-click on the new folder in the sidebar menu.
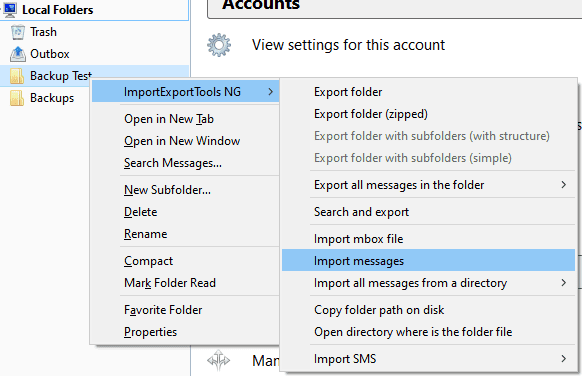
5. Hover over the ImportExport NG option, then select "Import messages".
6. Navigate to the folder with all of your .eml files in it
7. Select all of the files. (Ctrl-A). Click Open
8. Your emails should appear in your Thunderbird folder.
You should now be able to access and review all of your emails that you had stored in Zimbra! At this point, if you can see all of your emails, it is safe for you to go into your Zimbra account and delete everything. Your emails are safely stored on your computer and accessible in the Thunderbird email program.
Follow these steps every time you need to clear space in your Zimbra email storage – just create a new local folder every time.
SilverServers is here to help with your Zimbra email needs. Contact us for information about our email packages. We also provide website development, content writing, and SEO services for small and medium businesses. Let us know if you would like to learn about these services too – or get a free website review!
For more tips, check out the Email Support and Tips section of our blog!
Let Us Help Back Up Your Zimbra Email